For many years, Cakewalk Sonar has been a staple for home recording and professional studios all over the world. The unique layout, combined with a feature-rich set of tools, such as the integration of Melodyne and the Pro Channel has proven successful.
Try It: Soundtrap by Spotify. An online DAW with built-in autotune. Start recording music in minutes. Sign Up For Free.
Sadly, Gibson stopped all future developments for Sonar in 2017, effectively ending support for the DAW. However, in early 2018, the software was rebooted by BandLab Technologies, which acquired the intellectual property and the development rights.
The current software, Cakewalk by BandLab, is available completely free to download for Microsoft Windows via the BandLab Assistant app. While the premium add-ons via Sonar Platinum are not yet available, Cakewalk still retains all of the core capabilities of the classic DAW, with the addition of some new features.
Table of Contents:
- I. Setting Up
- II. GUI
- III. Console
- IV. Timeline, Editing & Mixing
- V. MIDI & Virtual Instruments
- VI. Video
- VII. Conclusion
Setting Up
At this time, Cakewalk by BandLab is only available for Windows operating systems. It is unclear if there are any plans to develop Cakewalk for Mac or Linux. Users wishing to install Cakewalk on Mac must do so via a Windows dual boot on the Bootcamp app.
To install the software, users can go the website at www.bandlab.com and download the BandLab assistant app. From there, users will be directed to create an account, given the option of linking their account with Soundcloud, and can then download the software via the assistant.
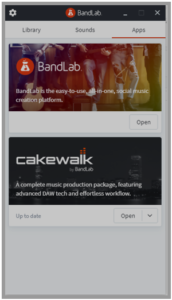
The BandLab assistant also offers a selection of loops available for download within the app. The user is given the option of installing Melodyne, the studio instruments suite, theme editor, and drum replacer.
Once downloaded, Cakewalk opens a start-up screen with the choice of selecting a template project, a built-in demo song, or a new blank template. The user can then access the DAW preferences with the shortcut ‘P,’ or by selecting ‘Edit’ à ‘Preferences.’
There, the user can select their audio interfaces drivers, activate or deactivate inputs and outputs, setup MIDI controllers, and set the sample rate and bit depth for the session.
Since MIDI controller names and audio drivers can often have long, unwieldy names that are difficult to remember, users can select the box “Use Friendly Names,” which allows the use to custom rename the drivers and MIDI devices to something shorter.
GUI
The GUI and layout of Cakewalk is sleek, professional-looking, and largely has the same feel to previous Gibson-owned incarnations. Workspaces in Cakewalk are referred to as lenses. At the top right corner of the screen, there is a drop-down menu with quick access to workstation view presets.
The Advanced lens displays the full set of modules, the timeline, console, and folder browser. The Mix lens quickly brings the mixing console to the front and center of the screen, and the Make Beats lens brings up the timeline and an empty drum pad matrix.
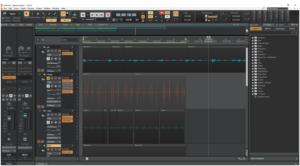
Editing View
In the same panel, users can create custom lenses and save them in the drop-down menu for quickly navigating workspaces on the fly. The lens customization in Cakewalk is a great feature that many DAW’s do not offer, so it is refreshing to see a feature that gives users more customization ability.
Cakewalk’s layout is somewhat complex, making it a little daunting for first-time users to navigate. Cakewalk uses a variety of docks, windows, and menus that easily be hidden or closed. While this allows for plenty of user customization, I often found myself clicking out of workspaces by accident and struggling to get my screen to look exactly as it did before.
This isn’t as much of a problem in other DAW’s, where screen space is confined to two workspaces, usually a mix and an edit window, or a variation of the two. For producers looking to quickly put their ideas down, the visual layout could potentially get in the way.
At the top of the screen, Cakewalk displays the module section, which contains the transport, tool selection, metronome options, time signature, looper, marker placement, as well as a few others. A feature that is unique to Cakewalk is the ability to save and recall mixes.
Pressing ‘save scene’ creates an exact copy of all of your current levels, plugin settings, instruments, MIDI information, and more. If you find yourself disliking your current mix, or if you want to return to a setting that you had before, select ‘Mix 1’ to instantly restore all of your settings to the moment when you saved your mix.
Cakewalk gives the users a lot of customization ability, and one where the user has a lot of control is theme customization. BandlLab includes a theme editor, which allows an image editing software to change the colors and style of most of the windows.
As a default, Cakewalk comes with two themes: Tungsten, a darker theme, and Mercury, a lighter theme. Like most other DAW’s, Cake can assign colors to tracks for easier navigation. In the timeline, the foreground & background color of individual tracks can be changed via Track Properties in the Inspector.
Console
One aspect of Cakewalk’s unique layout is the console. In the console, each of the individual tracks is displayed vertically, similar to a mixing board. Each console track displays the clip gain, a drop-down menu with the Pro Channel, a post/pre effects selector, sends, panning, mute/solo controls, volume, I/O routing information, and the track name. The gain knob controls the audio level before any of it hits the special effects, volume, or sends.
The Pro Channel is a special part of the console. After you open the drop-down menu, the Pro Channel displays a variety of high-quality effects that are instantly usable. While slightly more tedious to use than slapping an aftermarket plugin on the track, it is an excellent way to conserve processing power and free up your CPU for more intense tasks.
The stock Pro Channel displays 4 modules: a compressor, EQ, tube effect, and console emulator. The console emulator adds a light bit of saturation to the track, but the difference isn’t very noticeable. The compressor and tube emulator is decent, but there are other plugins I would prefer to using these. However, my favorite of these modules is the EQ module.
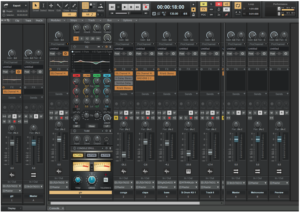
Console View
The Quadcurve Equalizer is a graphic EQ that displays the waveform volume across the frequency spectrum in real-time, allowing for precision editing. A keyboard is also displayed above the window, allowing you to quickly match up an errant note and find the corresponding frequency on the EQ. It comes with the standard EQ settings, but you can also change the EQ curve to match traditional analog responses.
The gloss button adds a little bit of sheen to the high frequencies, which makes a quick fix for instruments like high-hats & cymbals. For users who don’t have access to Fab Filter EQ’s, the Cakewalk Quadcurve EQ is definitely the best EQ plugin I have ever seen in a free DAW.
As far as the other modules in the Pro Channel, there is also a Tape Emulator, Console Emulator Bus/Channel, an FX Rack, 2 Reverbs, and a Saturation knob. These effects are also quality-sounding and available for every track, including the master fader.
For a beginning audio engineer who doesn’t have a ton of money to invest in plugins, the Pro Channel plugins included with Cakewalk are an excellent option, especially for a free program. The other free programs that come to mind are Audacity, which doesn’t have anything near the level of control or effects quality, and Pro Tools First, which has a limited track count and stock plugin ability.
Timeline, Editing & Mixing
If you are familiar with another DAW, then you should find the editing process on Cakewalk to be very similar. In the timeline, there are two basic types of tracks: 1. Audio and 2. MIDI. A special 3rd track, Instrument Tracks, is essentially a combination of the two tracks, allowing you to control both the MIDI data of a soft-synth or virtual instrument and the audio output and routing. Effects can be added to instrument tracks.
Cakewalk comes with a variety of audio editing tools, including automatic crossfades, automation, clip gain, as well as a brand new feature in the BandLab edition: time-warping. Zplane’s élastique time‑stretching algorithms allow for shifting the duration and pitch of audio clips, a feature that Sonar lacked.
The timeline displays the measures, minutes and seconds, and gridlines if you enable them in Options View. All of the tracks are displayed horizontally on the left side of the screen with a condensed version of the information in the Console view.
For quick navigation, there is a slider bar at the top of the screen that allows you to slide around the timeline. By default, if you click on any section of the music, the cursor automatically jumps to that spot, even if audio is currently playing.
At the top of the screen, the cursor options are displayed in a module, which shows the Erase tool, the Draw tool, the Edit tool, the Select tool, and the Smart Tool, which is the default cursor tool and functions as a combination of multiple cursor tools depending on the location of where you are in the audio clip. This is similar to the tri-tool in Pro Tools, which gives you the ability to move tracks, fade, and extend.

Smart Tool
A fundamental difference between Cakewalk and other DAW’s is how the program handles recording and audio clips. Like other programs, Cakewalk has punch in/out and overwrite modes. But it handles multiple takes in a unique way. While there is an option for recording separate takes to new tracks, Cakewalk has the ability to directly overlay two different types of audio in the same track. This means it is possible to record 5 different takes and line them up simultaneously on the same track without groups or bouncing. This also applies to audio that you have already recorded; it is possible to take two audio clips and overlay them in the same track.
Cakewalk features a Quick-Group function, which allows users to quickly control multiple parameters across several tracks at once. Select each of the tracks you wish to modify, and then hold CTRL and adjust the parameter. Tracks and individual controls can also be mapped to separate groups. In the Console view, busses and sends can be created by right-clicking the send button and creating a mono or stereo bus. The bus functions like an audio track, meaning that it can have FX inserts and be mapped to any output.
The FX processing in Cakewalk exists in two forms: as an FX insert in an instrument or audio track, or a processing function, similar to the audiosuite tool in Pro Tools. This works by selecting a clip or segment of a clip that you wish to process, selecting a plugin or effect, and performing a quick, destructive edit on the segment selected.
The processing tool allows you to audition the clip first, which means that it will play the effect without actually performing the function. For precision audio editing, this can be a lifesaver. Often, there is only a small guitar squeak in one spot or a vocal mouth noise that gets out of control for one word. Instead of using precious CPU resources by inserting a plugin, you can simply apply the effect once and be done with it.
MIDI & Virtual Instruments
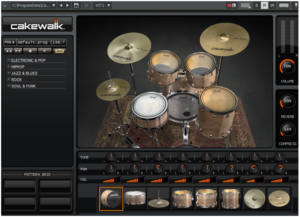
SI-Drum Kit
Cakewalk by BandLab includes a variety of MIDI editing tools, as well as a small selection of virtual instruments to choose from. The stock sample bank includes a piano sound, a drum kit, electric bass, strings, and the Cakewalk TTS-1 soft synth. While the included virtual instruments are usable, I would recommend getting a quality sample bank from Native Instruments or Eastwest for serious producers and composers.
By comparison, Pro Tools First, another free DAW, includes the Xpand! 2 sound library which offers a wider variety of quality sounds to pick from. Nevertheless, the stock virtual instruments in Cakewalk are a nice bonus to have, especially in a free program.
Once you create an instrument track, you can select the MIDI controller input, the audio output, and the virtual instrument to be used. Right-clicking enables you to insert a MIDI file into the track. Double-clicking on a clip enables the piano roll view, where you can manually input MIDI notes, draw velocity, and change the duration.
If you are recording MIDI and you wish to change the timing after it has been recorded, Cakewalk comes with a quantization feature. With this feature, you can control the amount of correction, swing, offset notes, and randomize
Video
Cakewalk has the ability to work with video. To get started, import a video file from the File menu. The audio from the video should be imported onto a separate track, and the video should start playing from a separate window. This makes Cakewalk a possibility for film composers or engineers who work with Film and Television. Like other DAW’s with video capability, the function is only limited to playing back video and editing the audio, not image editing.
Once the editing is complete, Cakewalk has a few options for exporting video codecs, including H. 264, WMV, MPEG-4, and others.
Conclusion
Cakewalk by BandLab is a powerful DAW, regardless of cost. The fact that BandLab is offering it for free speaks volumes for its value. There is nothing to lose by downloading it, learning it, and using its features, even if you are already familiar with another DAW. For the home musician, Cakewalk offers a lot of features for literally no cost.
- Impressive value for free DAW
- A powerful set of tools
- Quality mixing plugins
- Destructive and non-destructive editing
- Lots of user customization
For the mixing engineer, Cakewalk has some wonderful sounding stock effects in the Pro Channel in the console view. Unfortunately, this program is Windows only at the moment. Many professional studios are Apple-powered, which will prevent a lot of studios from adopting it into their platform.
For Windows users, Cakewalk is an excellent tool to have at your disposal. Cakewalk is a little time-consuming due to the window layout, which could be a concern for producers who need on-the-fly inspiration. If you can get comfortable with the window layout and navigation, however, Cakewalk is an excellent multi-purpose DAW that would make a fine addition to any audio engineer’s toolbox.
Thomas began helping out back in 2010 with the first few iterations of the website. He has helped to produce much of the content, formed partnerships with Audio Engineering institutions, and created the latest version of the website. Thomas handles many of the artist interviews as well as guitar content.