Automation is an important technique in music production. Automation allows music producers to change certain parameters over time and enables more creativity.
These parameters can include any modifiable value on an instrument, mixer track, effects, channel volume, or third-party plugins.
For example, you might want to create a filter that changes over time, so a sound is gradually filtered down to silence. To do this you would automate the “Filter Cutoff Hz” parameter.
The way automation works varies between DAWs. Although it generally revolves around the same principles of an “X” over Time chart.
Automation in FL Studio revolves around the system of automation clips. Automation clips are paired with piano roll data or an audio clip. The automation clip “talks” to its associated channel or audio file.
This tutorial explains how to automate in FL Studio using Automation Clips. We also discuss some important automation techniques that help with speed and creativity.
Table of Contents
- Steps to Add Automation in FL Studio
- More Tips & Advice
- How to add automation tracks in FL Studio Mobile?
- Conclusion
Steps to Add Automation in FL Studio
#1 Create an Automation Clip
For the first step, we will learn how to create an automation clip using the “Create Automation Clip” command. In this tutorial, we will perform some volume automation as an example.
To create automation clips, navigate to a parameter you want to automate. This could be a volume control, effect parameter, filter, channel controls, envelope… pretty much any changeable value in FL Studio.
These can be accessed from the mixer, channel rack, or the effects rack. Or directly from an instrument.
Right-click the parameter you want to automate. From the drop-down menu, select “Create Automation Clip”
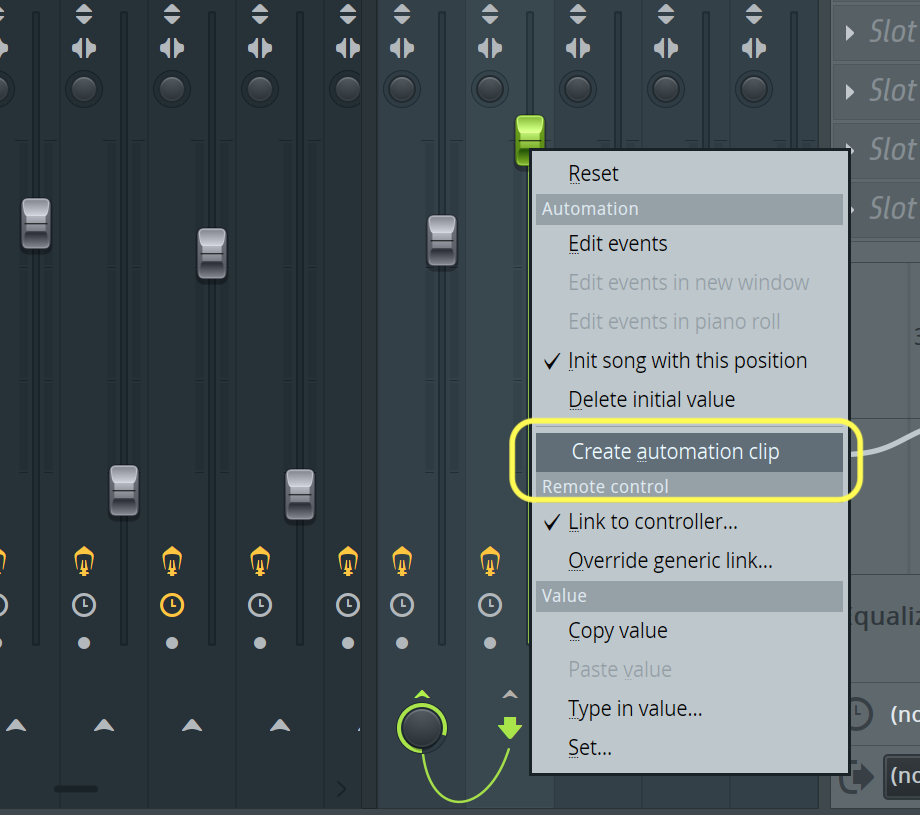
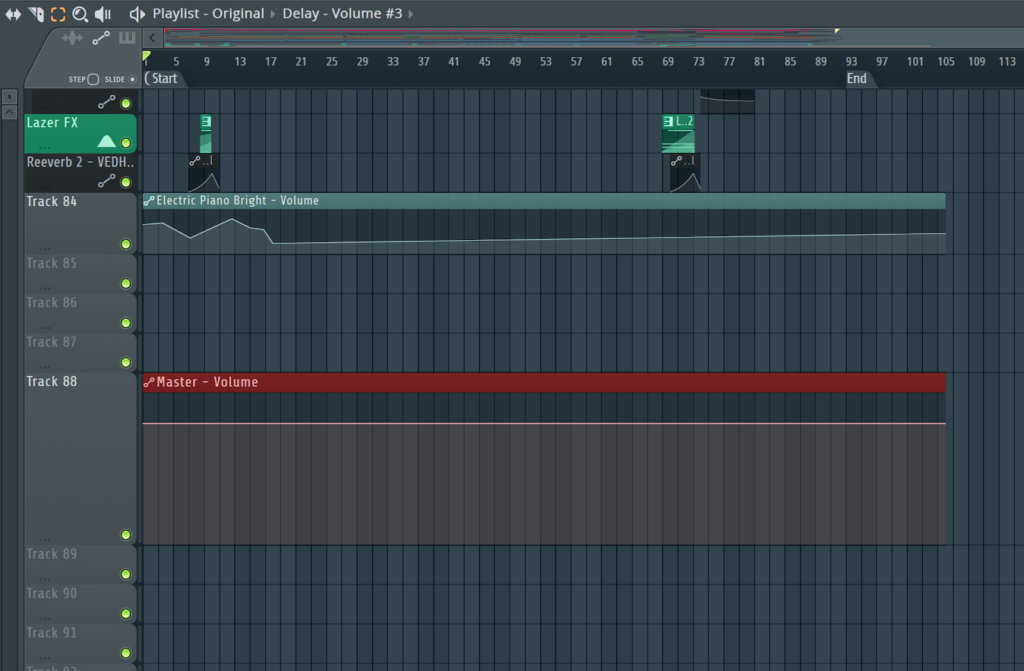
A new automation clip will be created and placed on the playlist below the target audio clip.
In FL Studio, the automation clip system is the main tool for managing automation. After you create an automation clip, it’s added to the clip browser. The Automation Clip menu makes it easy to reuse clips around the project. This saves you from having to create an automation clip every time you want to automate something.
#2 FL Studio Automation Clip Playlist Operations
To the left of the FL Studio’s playlist window is the Clip viewer.
This has 3 modes: Audio Files – Patterns – Automation.
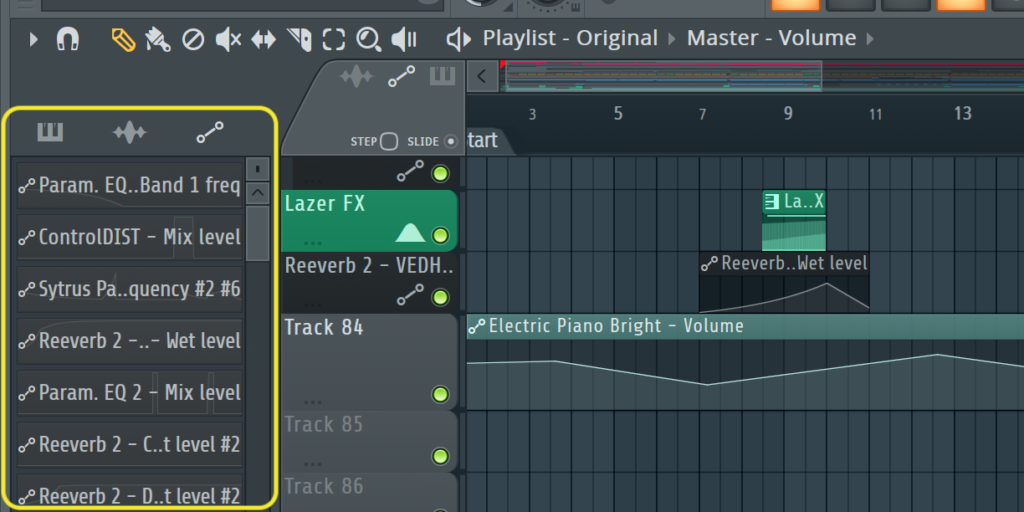
Selecting each one will display all items in its category. Selecting Patterns shows all the pattern clips in the project, selecting Automation displays all the automation clips.
Automation clips can be dragged from the clip menu into the main playlist of FL Studio. This way you can reuse automation clips without having to redraw them.
#3 Creating, Moving, & Deleting Points
Here comes the fun part. Now we begin to add control points to the Automation Clip.
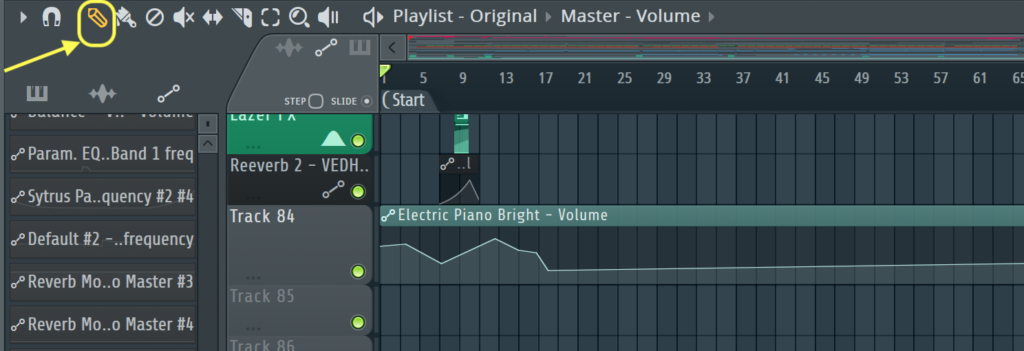
First, make sure you have the Draw Tool Selected (pencil icon) from the top left toolbar. Draw mode needs to be activated for the majority of automation functions.
The other modes do not work for placing control points and will interfere in the arrangement of the automation clip
Creating Points
Whilst holding down the Control key on the keyboard, click anywhere on the white line inside the automation clip. (or right-click)
This will create a new point. You can add as many new points as you want. The value will be the same as the initialized controls.
Understanding where to place control points is essential to mastering automation techniques. Think about how the parameters will interact with the audio clip. Automation can help to demonstrate the journey or progression musical elements undergo throughout a track.
Moving Points
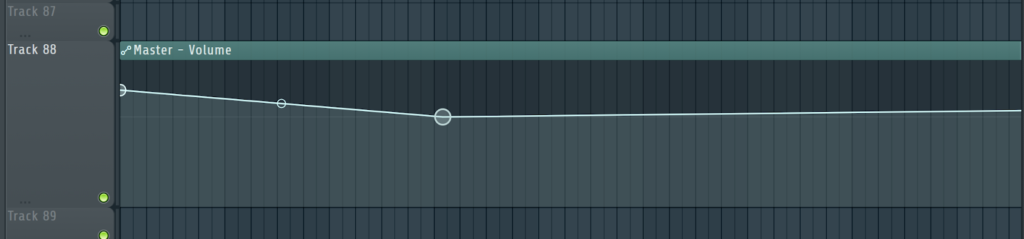
Points can be moved around the clip by clicking and dragging them. Moving points left and right changes the time of the event data. Changing the vertical position of a point sets the value of the parameter at that point.
The value of the parameter will transition between the values given by each point.
The smaller circle in between points changes the curve of the transition. This shape can also be changed (explained below). This is called tension control.

Deleting Points
Points can easily be removed from an automation clip. Simply right-click the undesired point, and select the “Delete” event from the popup menu. This can be undone with CTRL/CMD+Z.
This will delete any selected points.
After adding some points, listen back to the clip. Before playing, make sure FL Studio is in song mode, rather than pattern mode. This control is found in the transport panel at the top of the screen. If it’s in pattern mode, you will only hear what’s playing in the step sequencer, which doesn’t contain the automation clip.
You should now hear the parameter automatically change over time.
Any interface elements related to the automated parameter, for example, a volume knob or the mixer faders), should move in sync with the playing automation.
#4 Setting Point Values
The event data for each point’s value can be specified for more precise control of the automation. This is useful when you want to fine-tune automation clips.
Right-click an automation point, from the popup menu select “Type in Value…”
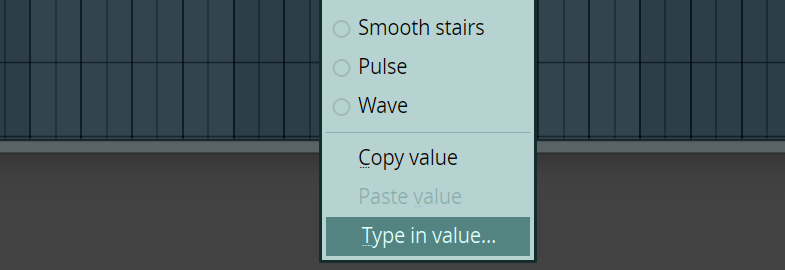
A dialogue box will appear. Type in the desired new value, and click the tick or press enter.
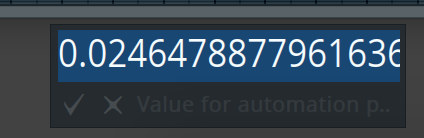
This will set the parameter to the exact value specified.
(Click the X to reset to its original value).
Use the Copy Value to grab the numbers, then paste them into other points, if needed.
Directly writing the note values gives full control over the automation clip. Some producers’ automation techniques revolve around manual drawing, others are more numerically focused.
Understanding the numbers and values will help you to create better automation.
#5 Tension & Shape Modes (Use paragraphs and liner)
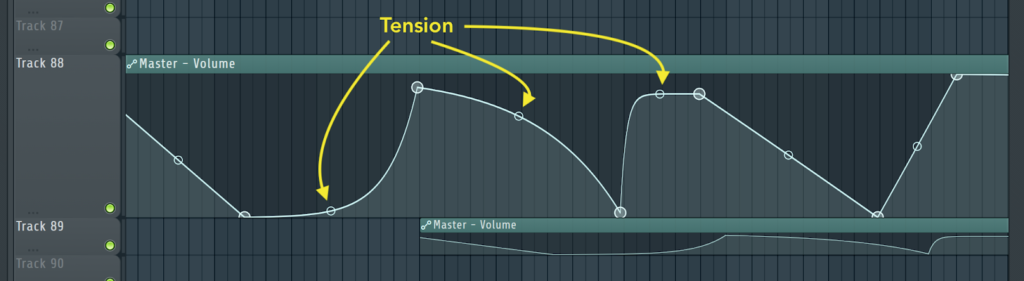
A tension node is a tool for creating smoother transitions in an automation clip. The tension node in FL Studio appears on the line after you create an automation clip.
Changing the tension modifies the shape of the transition line. There are several different methods for transitioning.

- The shapes include single curve, double curve, half-sine, smooth stairs, pulse width, sine wave, and more.
- The curves are the easiest shapes to work with. They are great for making risers and build-ups.
- The single curve is the standard format, one gradual curve between each point.
- The double curve is more complex, with an S-like shape.
- Feel free to experiment with tension settings and get a feel for the differences between each shape. Tension automation is a powerful sound design tool for audio clips.
- Using tension in automation clips is a cool way to add flourishes, and smooth out tracks.
- Curves and tension is an important element of automation techniques that should be mastered and implemented
#6 Using Points, Tension, & Shape Modes in Playlist Automation Clips
Follow the steps below to navigate using points and tension in playlist automation clips in FL Studio.
- Create Automation Clip from the desired parameter
- Place the first point, setting the first value for the initialized controls. The first point should start where you want the automation to begin. The first control point should set the starting value of the automation
- Create a second point (or more). Start drawing out the rough progression through values.
- Listen and check. If you are happy, move on.
- Use tension points to smooth FL Studio Automation. First, right-click a Point to select its tension shape mode. Each mode has a different feel.
- Adjust the slope of the curve. More aggressive curves can create snappier automation and effect changes.
#7 FL Studio Automation Clip Channel Operations
The FL Studio Channel Rack also has capabilities for automation. Within the step sequencer, there are automation controls for note velocity, note properties, and more.
This works differently from the automation clip system in playlist view.
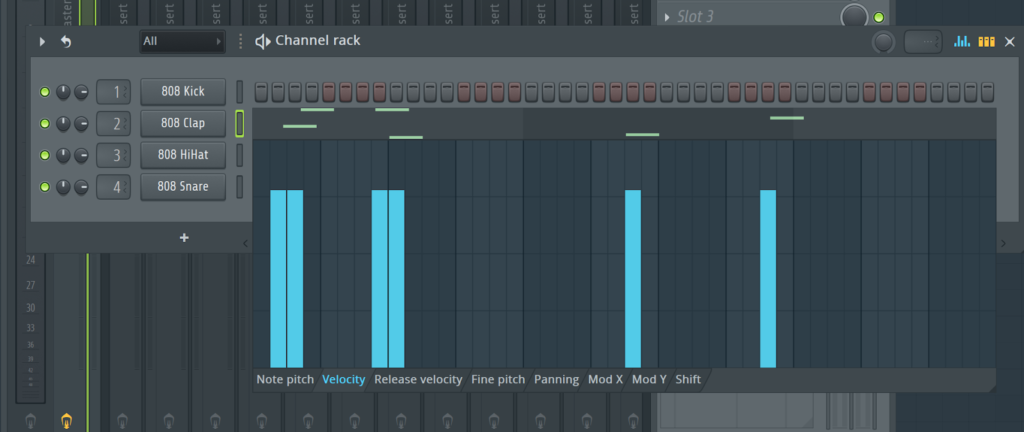
After opening the channel rack, click the blue bars icon in the top left corner. This opens the “Graph Editor” which is an automation tool for Channel Rack and Piano Roll.
Below the selected channel you will now see a series of blue bars in a horizontal chart. The height of each blue bar represents that setting’s value during that step. Click and drag the graph area for each step to set its value. At the bottom of the page, you will see multiple tabs for switching between automatable controls. In the Channel Rack, there are automation controls for Pitch, Note and Release Velocity, Fine-tuning, Panning, 2xModulation, and more
Using the graph editor is a great way to automate the velocity of percussive elements within a drum beat. Mastering velocity automation is key to creating organic and natural-sounding loops and drum beats.
Note: If you’re interested in learning more on fl studio and read our guide on fl studio.
More Tips & Advice (Use liners)
Understanding and implementing automation is essential to create interesting, dynamic music. Without using automation, music can sound blocky and static. Automation can add movement, fluidity, dynamics, and color to a track.
I personally find automation of the more exciting elements of music production. Try to develop a smooth and efficient workflow when working with automation clips. It may seem fiddly at first, but mastering the technique opens up a world of creative opportunities.
When it comes to mixing music, volume automation is a must. You want to control the volume throughout the whole track, ensuring all instruments and sounds are balanced. Pro mixers will often automate the channel volume on each track.
The same thing applies to effects values. Get creative and automate things like reverb decay, volume level, echo times, filter sweeps. Effects on the master channel can also be automated.
Rather than automating multiple instruments individually, try sending them all to the same mixer track. Create automation clips for effects on the summed mixer channel. This way many audio clips can be processed by the same automation. This method saves a lot of time and effort!
Automation Recording
FL Studio also features a method for recording automation in real-time. This is an amazing tool if you have midi hardware with knobs.
That way you can map your midi controller to an effect, say a filter, and record a live performance of you controlling that effect.
This can create more organic and natural sounding automation that doesn’t have to be neatly and manually drawn in using the mouse.
To use automation recording:
- Ensure you have a midi controller plugged and activated in FL Studio MIDI Settings.

- Click the “Multilink to controllers” button. Click the value you want to automate, then move a knob on the midi controller. This now maps the value to the knobs, so twisting the knob changes the value.
- Now click the Record button, and select “Record Notes and Automation”. Now, when you play, any Record-Armed track will write the automation data to a clip for any knob that gets moved.
How to add automation tracks in FL Studio Mobile?
The FL Studio Mobile application also has automation capabilities.
To create an automation clip in FL Studio Mobile, simply first select the parameter you want to automate. This could be a volume control, note velocity, filter, or any value. Touch the control first.

- Then, press the “…CTRL” button at the bottom of the screen. Then select “Add Automation Track”. This will make a new automation clip within a track.
- Click on one automation clip and select edit.
- You can now draw anywhere on the automation channel.
- Tap anywhere to add a new point, points can be removed by double-clicking or using Undo. Simply drag the points to move them. Unfortunately, there is no tension control or curve shapes. But it works well for a mobile app!
Also read our post on how to record vocals on fl studio and on how to add plugins to fl studio 12.
Conclusion
This concludes the tutorial on adding automation to FL Studio. Automation is a seriously useful tool and key to modern music production.
Before the invention of DAW’s or automated mixing desks, “automatic” automation was not possible, so engineers would have to “perform” the hardware. At this level, using and manipulating the effects in real-time almost takes as much skill as playing the actual instruments.
FL Studio makes automation a breeze. The automation tools are incredibly powerful for musical creativity, and so much more efficient than the traditional analog techniques. It is the best time to be a music producer!
We have many other FL Studio tutorials covering a range of techniques, practices, and tips!
Check them out!
Noah is an accomplished audio engineer with several years of experience producing music for major companies and independent artists. He enjoys sharing his vast knowledge of audio engineering topics to help musicians and music producers create great music.