Every producer has been through this: excited, you’re vibing to the track you’ve just created and giving it the final touches when all of a sudden Logic gives you an error message: System Overload!
Logic Pro X system overload is a fairly common issue that most users will come across sooner or later. This is because Logic, being the powerful DAW it is, demands a lot of performance and processing power from your computer.
When your Mac is not able to meet these requirements while performing heavy tasks such as recording and playing back a large number of MIDI instruments, you get the error message.
“But how do I solve or prevent this?” you may be asking yourself. That’s why today we’re bringing you a few tips and tricks on how to avoid the Logic Pro X system overload error, as well as the best practices to take to keep your Mac up with the entire music making process.
Tip: Check out our complete, updated review of the DAW at Logic Pro X Review 2021.
Table Of Contents
- What Causes The Logic Pro X System Overload?
- How do I Solve and Prevent the Logic Pro X System Overload?
- Conclusion
What Causes The Logic Pro X System Overload?
There are a few things that may give you a system overload on Logic Pro X. Most are related to the processing power of your computer and to the amount of information it has to process at a time. Here are some of the most common causes:

Having A Large Number of MIDI Instruments in Your Project
MIDI instruments need to be processed in real-time and they’re the most demanding type of plugin. Depending on what’s going on in your project and what specific instruments you’re using, having a large number of instances can put a lot of load on your Mac’s processing.
Having a Large Number of Audio Effect Plugins/Not Using Sends
Similar to MIDI instruments, audio effect plugins can be very heavy to run, and an average project can easily have hundreds of effect instances. You can improve your performance by using certain effects such as reverbs and delays as sends, which we will explain how to do further down the article.

Recording External Instruments
When you record external instruments, your computer must take care of a lot of stuff to make everything work seamlessly. It will receive the signal from your audio interface while at the same time playback the project so you can hear what you’re recording along with the rest of the song.
To record, we usually use smaller buffer ranges so as to not have too much latency, but they can have a negative impact on your Mac’s performance. We will explain what this configuration parameter is and how you can set it up correctly later in this article.
Too Many Apps and Processes Running In The Background
Having too many apps open while you work on Logic can significantly take a toll on your computer’s efficiency. Plus, there are often processes running in the background such as software updaters and widgets that you may even not know about.
How Do I Solve and Prevent the Logic Pro X System Overload?
As the Logic Pro X system overload issue is fairly common, solving and preventing it is pretty simple through some easy steps. Here are a few things you can do right now to improve Logic’s performance:
Close Other Apps and Check Background Processes
As obvious as it may seem, a simple browser window opened in standby might considerably cap Logic Pro X’s performance. We recommend that you close everything you’re not using while working on the DAW.
Your Mac may also be running heavy background processes that you’re probably not even aware of. Go to your Spotlight search and type in “Activity Monitor”. In this app, you can see and close everything that is active on your computer, as well as filter it by RAM and CPU usage to help you find the most demanding processes.
Bounce MIDI Tracks
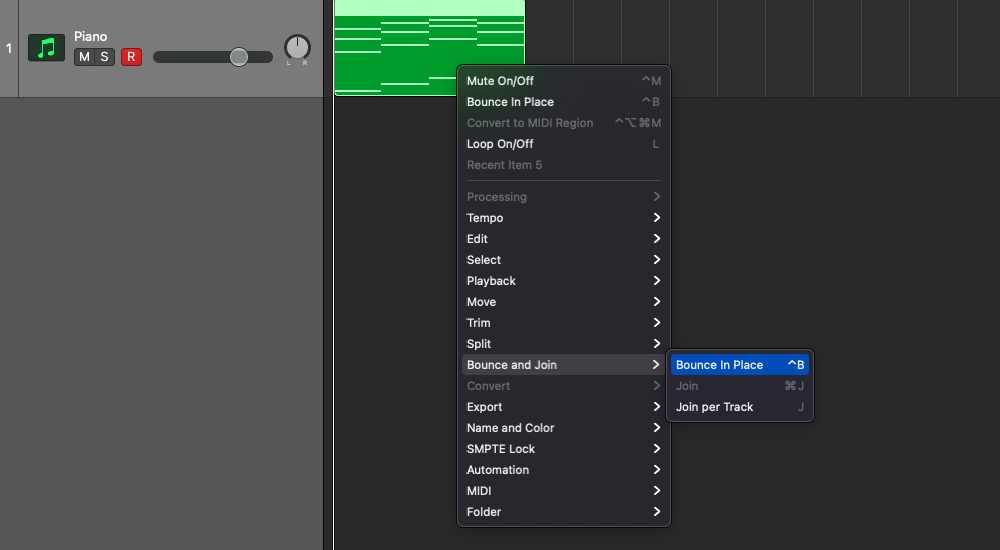
Logic Pro X has a fairly simple system of bouncing MIDI tracks. You just need to right click the region you’d like to turn into audio and find the option “Bounce In Place”, under “Bounce and Join”. This is one of the best, most effective solutions to the system overload problem, as MIDI instruments take much more processing power than audio tracks.
Keep in mind though that this process is irreversible, so you might want to back up your project before doing it.
Increase the Buffer Range
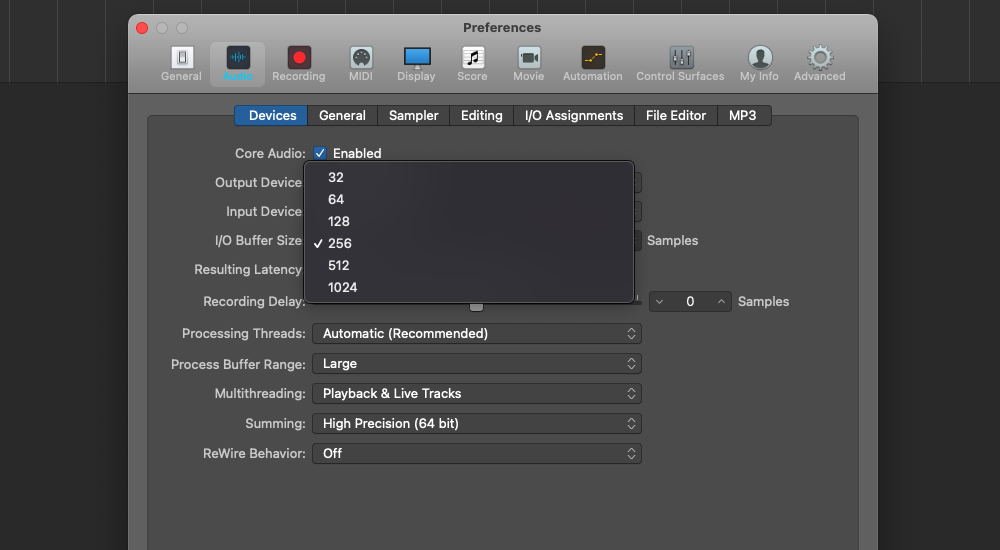
Another great solution is increasing the buffer range. The buffer range determines how your Mac handles all the processes coming at it. The only drawback is that a larger option such as 1024 samples will give you more latency when recording, but when just playing your project back and doing tasks such as composing and mixing, it will help Logic perform much better.
To find this option, click on “Logic Pro” at the upper left side of the screen and then “Preferences – Audio”. There, you can try different values for the I/O Buffer Size. Keep it as high as possible when you’re not recording.
Disable Inputs That Are Not Being Used
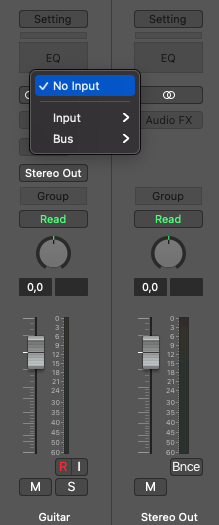
Few people know this, but leaving your track inputs assigned while not recording may drain lots of processing power from your Mac. The solution is simple: once you’re done recording, bring up the track inspector or mixer view and find the input section. Click on it and choose the option “no input”.

Freezing Tracks
If you have tracks, especially MIDI instruments, that you don’t want to bounce just yet, the freeze function is an excellent solution. It creates a snapshot of the region that is reversible so you can edit it later if you desire.
To see the option, you must first habilitate it: right click on your track’s header, open Track Header Components, and then select Freeze. A button with a snowflake will appear on the track: turn it on, press play, and Logic will start freezing its regions. Click on it again to undo.
Use Send Inserts
Using sends has lots of benefits. Apart from relieving the load on your CPU, it will make you able to send the same effect, such as a reverb or a delay, to multiple tracks thus improving your workflow and your mix coherence.
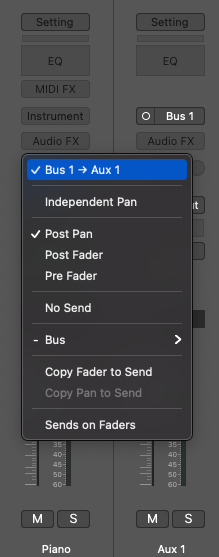
To insert a send on your track is simple: open the track inspector or the mixer view and then click on Sends. Expand the Bus section and you will see a list of the busses available: click on an empty one.
Now, insert any effect plugins you want on your selected AUX bus and use the little knob on the right of your main track’s send insert to adjust the dry/wet parameter. You can insert the same send instance on multiple tracks.
Tip: If you want to improve your mixes, check out our How To Fade Out In Logic Pro X article, where we teach an essential skill for any Logic producers: how to create fade outs.

Use A 44.1kHz Sample Rate
The sample rate refers to the amount of detail that is present in your track’s waveform. Even though Logic Pro lets you set your sample rate up to 192kHz, the smallest 44.1kHz option is the standard for most music applications and it is more than enough to get a quality recording.
To change the sample rate of your project, click on File on the upper left corner of your screen, Project Settings, and then Audio. There, you can expand the Sample Rate section and select your desired value.

Upgrade Your Drive
If you’re still using a hard disk drive as your main system’s drive, it is worth upgrading it to an SSD. SSDs are much faster, especially when processing audio/registering info into your computer, and they will give you a much smoother and faster workflow.
Alternatively, you could also store your projects on an external SSD and open them directly from it. This may unload your system a little bit. Do however keep a regular backup of your Logic files in any of the cases.

Invest In More RAM Memory
Last but not least, if none of these solutions are giving you results, then you might have to invest in more RAM memory for your Mac. Check if your Mac’s RAM is upgradeable and what is the limit of memory it can hold before making any purchase.
We also advise you to hire a qualified professional if you don’t have the necessary experience to open your computer. Check out this article by AVG on How to Upgrade RAM on Mac to see a list of which Mac models are upgradeable and more information on the subject.
Conclusion
These were our tips on how to solve the Logic Pro X system overload issue. Remember to apply these best practices not only when the problem pops up, but throughout your music making routine, so as to prevent it.
Let’s recapitulate all the steps:
- Close apps you’re not using and check for any background process that may be hurting your Mac’s performance.
- Bounce your MIDI tracks in place – MIDI instruments tend to be quite demanding of performance.
- Disable the input on tracks that are not being recorded at the moment.
- Freeze tracks if you’re not ready to bounce them.
- Use send inserts when applying audio effect plugins such as reverbs and delays.
- Set your project to use the 44.1kHz sample rate. It will be more than enough for most music production applications.
- Upgrade your drive to an SSD if you haven’t already. Alternatively, you can use an external SSD and open your projects from there.
- Consider investing in more RAM memory for your Mac.
Also, make sure to try every single step that you can take right away before investing in more RAM memory or on a new Mac computer. Sometimes the problem can be solved by adjusting simple parameters on Logic’s setup.We hope we’ve helped you solve the Logic Pro X system overload issue. If even after taking these steps you’re still unable to improve your Mac’sperformance, we suggest directly contacting Apple Customer Service or through Apple Support Community. Feel free to hit us up if you have any questions that you think we could answer though!
Ian Sniesko is an experienced music producer and musician who loves to share his knowledge about the best audio equipment for making and enjoying great music. For the past 6 years, Ian has written extensively about the audio equipment industry and has contributed to many of the top music magazines.