In music production, the fade-out is a technique used to create a gradual reduction of the volume in a given audio track, region, or song. It is one of the most quintessential skills a producer should have. Wondering how to fade out in logic pro x? Keep reading!
The tool can be applied in your productions so you can make smoother transitions between sections of your project, as well as end a song gradually. A famous example of the latter is in Phill Collins’ song “In The Air Tonight”.
There are a lot of ways to make fades in Logic, but the most common ones are via automation and the fade tool. The proper way in each particular case will depend on factors we will get into further down the post.
In this article, we will show you different tools and explain how to fade out in Logic Pro X step by step, with screenshots to help you better along the way.
Related: for a complete breakdown of all the tools available in Logic, check out our Logic Pro X Review 2021 post.
Table of Contents
How to Fade Out In Logic Pro X
In Logic Pro X, you can fade out audio tracks using the fade tool located in the top right corner of the audio file or by selecting the “Fade Out” option in the “File” menu. You can also adjust the fade-out time and shape by selecting the track header’s fade-out curve.
Steps on How To Fade Out In Logic Pro X
There are a few different ways you can create a fade-out in Logic Pro X. The ideal kind of fade tool for each case and project will vary depending on whether you’re doing it to audio regions, MIDI regions, etc. Below, we are going to cover every type.

Fade Out Via Automation
The most simple way to make a fade out in Logic is to do it via automation. It will work for any type of track, whether it is MIDI, audio, or effect send. Here is how you do it:
- First, select the track you want to make a fade out in the main window and hit the A key command to show up its automation.
- Open up the yellow menu at the bottom center of the track header. Search and select volume.
- Click once to activate volume automation for that track.
- Click on the beginning and ending point where you want your fade-out to be.
- Drag the last point down until the volume reaches -∞ dB.
- With your fade created, feel free to make any fine adjustments to your fading points.
- You can make a curve on your fading automation for better control. To do so, click on the Tool Selector at the top of the Arrangement View and select Automation Curve Tool. Then, left click between your automation points and drag it up or down.
Fade Out Via Fade Tool
There is an even easier way to make a fade out, and it is through the fade tool. Keep in mind though that this method will only work on an audio file/track and not on MIDI instruments. Here are the steps:

- Head over to your Tool Selector at the top of the Region View. Expand and select the Fade Tool.
- With the fade tool selected, head to the desired audio region and left click on the starting point of your fading.
- Drag the mouse until you reach the end of your fade.

Fade Out Via Region Inspector
Another quick way to make fades is via the Region Inspector. But, similarly to the fade tool, it will only work with an audio region. This method is very good for improving your workflow so make sure you follow along the steps:
- Select your desired track and find the section Region Inspector, on the left upper side of your screen. If you haven’t already, click the arrow to expand it.
- Click on More.
- Find the Fade Out section and input the desired value for your fade. If you’re unsure, try different numbers until you reach the perfect one.
- With the fade created, use the Curve section to make an automation curve on it if you’d like to.

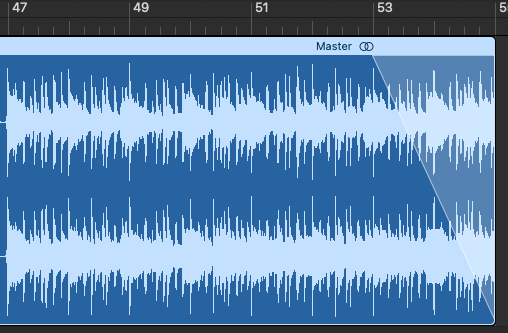
Fade Out Via File Editor
The last method is the fade out via File Editor. Remember though that this method is destructive, meaning that it will directly edit the original file for your selected tracks.
- Click the button with a pair of scissors icon on the upper left area of your screen or press the E key.
- On your waveform, left click where you want the start of your fade to be and drag it to the desired ending point.
- Select the File section.
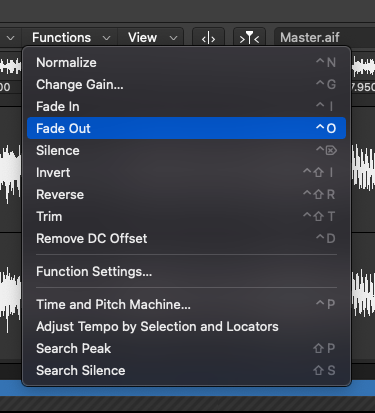
- Find the Functions menu right above your waveform, on the left. Expand it and click on Fade Out.
Tip: To learn how you can add plugins in Logic to improve your music production workflow, check out our How To Add Plugins To Logic Pro X post.
Frequently Asked Questions
How Do I Create an Automation Curve On My Fade Out?
If you’re doing it via the Region Inspector, find the Curve section and input your desired value. Try different numbers to get to the perfect curve.
How Can I Use Fade Outs in My Song?
How Do You Fade Out a MIDI Instrument in Logic Pro X?
Tip: struggling with system overload in Logic? Please make sure to look at our Logic Pro X System Overload post to learn how to solve and prevent the problem.

Conclusion
These were our step-by-step guide on how to create fade-outs in Logic Pro X using the different tools provided by the software.
Ultimately, the best tool for creating your volume fade-out will depend on the type of region you’re working on. For fading MIDI instruments, you must do it via the Automation section. For audio tracks, you can use the fade tool, as well as all the other methods mentioned.Thanks for reading our guide. We suggest you also take a look at our other articles and posts about Logic Pro X for more techniques, tips, and tricks. Feel free to contact us if you have any further questions!
Ian Sniesko is an experienced music producer and musician who loves to share his knowledge about the best audio equipment for making and enjoying great music. For the past 6 years, Ian has written extensively about the audio equipment industry and has contributed to many of the top music magazines.